The steps below outline the installation process for the plug-in. If you need help downloading the installation files necessary to proceed through these steps, please see Adding Plug-ins to TeamConnect.
The Office Plug-in must be installed and configured prior to installing the Outlook plug-in.
To install the TeamConnect Outlook Add-In
1.Select the appropriate x86 or x64 installer based on your version of Outlook.
2.Double-click the setup.exe file.
3.Click Next from the TeamConnect Outlook Add-In window.
4.If you want to change the folder where the installer saves the add-in, click Browse.
Note: To use the default folder, click Next.
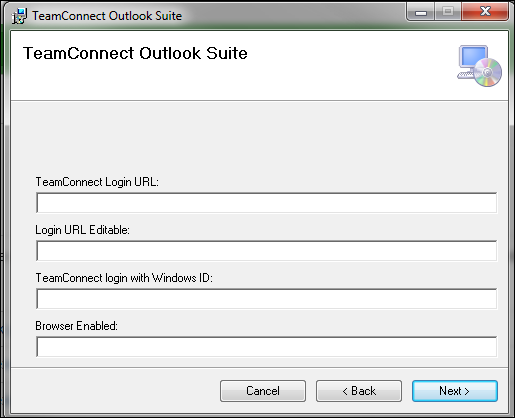
5.From the resulting window, enter the URL for your instance of TeamConnect. Include http:// at the beginning and / at the end of the URL.
| ex. http://testsite:3303/4.0.2/ |
Note: If you want to preset the log-in url for your users, enter "false" in the URL editable entry field. This will ensure that users cannot edit the log-in URL. Entering "false" will not work if there is no log-in URL. Enter "true" if you would like to make the URL editable. All fields left blank will default to "true," with the exception of Browser Enabled.
Note: If you want to remove the built-in browser from Outlook, enter "false" in the Browser Enabled entry field. Enter "true" to leave the browser in the program.

Outlook Installation
6.Click Next to begin the installation.
7.Click Next from the resulting window.
8.After a successful installation, click Close to exit the installer.
After successful installation, the TeamConnect tab appears in Outlook. If you need to change your TeamConnect login information, click the Settings button from the TeamConnect window. Entering your login information allows TeamConnect to integrate with the Office programs. See Project Integration for further details.
