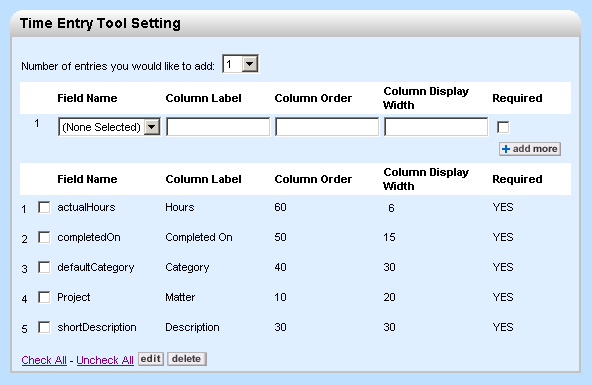
You can change how Time Entry Tool fields display and whether the fields are required by users.
1.From the Main menu, click the Go to drop-down list and select Time Entry Settings. 2.Click the Time Entry Settings link. 3.Click Edit. The following fields are on the General tab, Time Entry Tool Setting Block. 4.To change the text that displays for default fields on the Time Entry Tool: a.Check the box(es) next to the existing Field Name and click edit. b.Type the new text to identify the field in the Column Label box. c.Click ok on that field row. 5.To change the position of a Time Entry Tool field from left to right: a.Check the box(es) next to the existing Field Name and click edit. b.Type a numeric value in the Column Order box, where the lowest value displays furthest to the left and the highest value displays furthest to the right on the screen. c.Click ok on that field row. 6.To change the maximum length for displaying the field's Column Label: a.Check the box(es) next to the existing Field Name and click edit. b.Type a numeric value in the Column Display Width box. This value determines the length of space allotted to display the corresponding Time Entry Tool field value. For example, for the actualHours field, the default Column Display Width of 6 would allow a Time Entry Tool user to enter a value like 100.25 c.Click ok on that field row. 7.To set whether an existing Time Entry Tool field is required by users to complete: a.Check the box(es) next to the existing Field Name and click edit. b.Clear the Required box to display the field but allow blank values, or check the Required box prevent saving this field with blank values. c.Click ok on that field row. 8.To display the activityItem field on the Time Entry Tool: a.From the Number of entries you would like to add: drop-down list, select 1. b.From the Field Name drop-down list, select activityItem. c.Type a descriptive field label in Column Label box (for example, Task Activity). d.Type the field's Column Order (number). e.Type the Column Display Width. f.Set the Required check box. See field explanations above for more information. 9.Click Save. |


